SPFx and Function Apps
This post will go over how to call a function app api securely from SPFx.
Overview
This blog post will show you how to call an Azure Function API from SPFx securely. We will create a function app, add sample data to return, create the SPFx application and then go over the authentication steps you need to take in order to securely call it.
I will go over all changes you need to make throughout the process to explain what/why a configuration change is needed.
Initial Setup
First, we will create the function app and spfx solutions, and get them to talk to each other. This will ensure it’s working prior to securing the api calls.
Create the Function App
- Access the Azure Portal
- Select the
Create a resourceoption from the home screen - Select the
Createlink underAzure Function - Select the
Consumptionoption for the hosting plan
Select the Runtime Stack
For this example, we are going to use PowerShell to return an array of test data. Fill out the required fields and set the runtime stack to PowerShell Core. Review and create the function app.
Create Function
Once the function app is created, access it and create the function.
- Select
HTTP triggerfor the template - Set the function name to
GetTestData - Select the
Createbutton
Set PowerShell Script
Set the run.ps1 script and save the changes.
using namespace System.Net

# Input bindings are passed in via param block.
param($Request, $TriggerMetadata)

# Write to the Azure Functions log stream.
Write-Host "PowerShell HTTP trigger function processed a request."

# Set the test data
$body = @(
    @{ Id = 1; Title = "Test 1" }
    @{ Id = 2; Title = "Test 2" }
    @{ Id = 3; Title = "Test 3" }
    @{ Id = 4; Title = "Test 4" }
    @{ Id = 5; Title = "Test 5" }
);

# Associate values to output bindings by calling 'Push-OutputBinding'.
Push-OutputBinding -Name Response -Value ([HttpResponseContext]@{
    StatusCode = [HttpStatusCode]::OK
    Body = $body
})
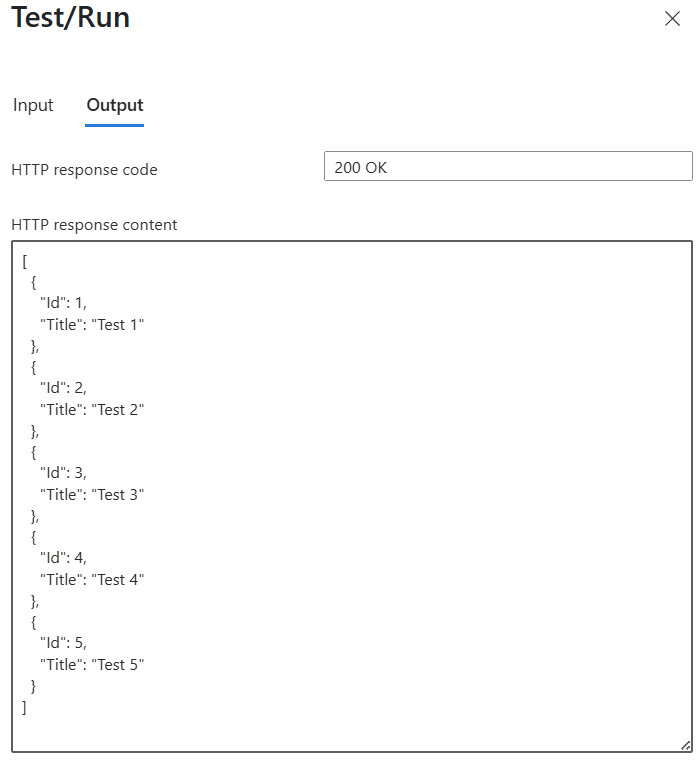
Test the Function App
- Click on
Test/Runto test out the function app and ensure it returns data - Click on
Get Function URLand copy the default url for the SPFx solution
Create SPFx Solution
Next we will create the SPFx solution and have it call the function app. Once we have this working, we will secure the api call.
Create Project
Run yo @microsoft/sharepoint and set the following properties
- Solution Name: spfx-fa-demo
- Component: WebPart
- WebPart Name: HelloFunctionApp
- Template: No framework
Update package.json
Update the package.json file and add a new script to clean, build, package and generate the .sppkg file under the sharepoint/solution folder.
"scripts": {
  "build": "gulp bundle",
  "clean": "gulp clean",
  "package": "gulp clean && gulp build --ship && gulp bundle --ship && gulp package-solution --ship",
  "test": "gulp test"
}
Global Variables
We will use global variables to store the API information. Paste the function app url from the Test the Function App step as the value.
// https://[FUNCTION APP NAME].azurewebsites.net/api/[FUNCTION NAME]?code=[SECRET KEY]
private _uri = "https://fa-spfx-demo.azurewebsites.net/api/GetTestData?code=[SECRET KEY]";
Update render() Event
Since we are just trying to get the solution to work, we will use the built in httpClient component from the SPFx’s context. We will need to reference the component, so add the following import statement.
import { HttpClient } from "@microsoft/sp-http";
We will render the test data in a simple html table, after getting the information from the GetTestData api call.
public render(): void {
  this.domElement.innerHTML = `Loading the data...`;

  // Call the request
  this.context.httpClient.get(this._uri, HttpClient.configurations.v1)
    .then(resp => {
      return resp.json();
    })
    .then((data: object[]) => {
      this.domElement.innerHTML = `
        <table>
          <thead>
            <tr>
              <th>ID</th>
              <th>Title</th>
            </tr>
          </thead>
          <tbody></tbody>
        </table>
      `;

      // Add the data rows
      const elRows = this.domElement.querySelector("tbody") as HTMLElement;
      data.forEach((item: { Id: string; Title: string }) => {
        // Append a row
        elRows.innerHTML += `
          <tr>
            <td>${item.Id}</td>
            <td>${item.Title}</td>
          </tr>
        `;
      });
    })
    .catch(err => {
      this.domElement.innerHTML = `Error calling the client...`;
      console.error(err);
    })
}
Remove Unused References/Variables/Functions
The linting rules will require us to clean up the code of unused methods and variables. Before building the solution, we will need to do the following:
- Remove the default
_getEnvironmentMessageandonThemeChangedmethods - Comment out the
onInitmethod, as we will need to add code to this when we secure the api - Remove the unused import statements
Test SPFx Solution
- Run
gulp serveto test the SPFx solution - Access your SharePoint site’s workbench
/_layouts/15/workbench.aspx
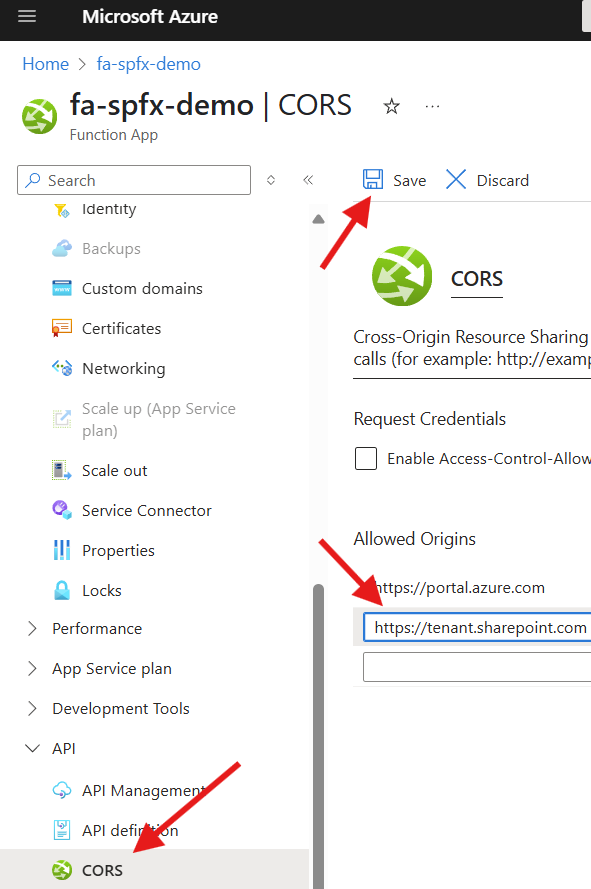
Fix the CORS Error
The solution will have an error message displayed. Further investigation from the develper console will show a CORS error.
workbench.aspx:1 Access to fetch at 'https://[FunctionAppURI]' from origin 'https://[tenant].sharepoint.com' has been blocked by CORS policy: No 'Access-Control-Allow-Origin' header is present on the requested resource.
- Access the
Function App - Select
CORSunder theAPImenu - Add your tenant url to the
Allowed Origins - Click on
Save
Note - This may take a minute or two, but refresh the SPFx test page and you should see the sample test data.
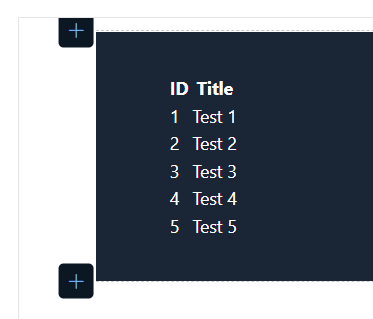
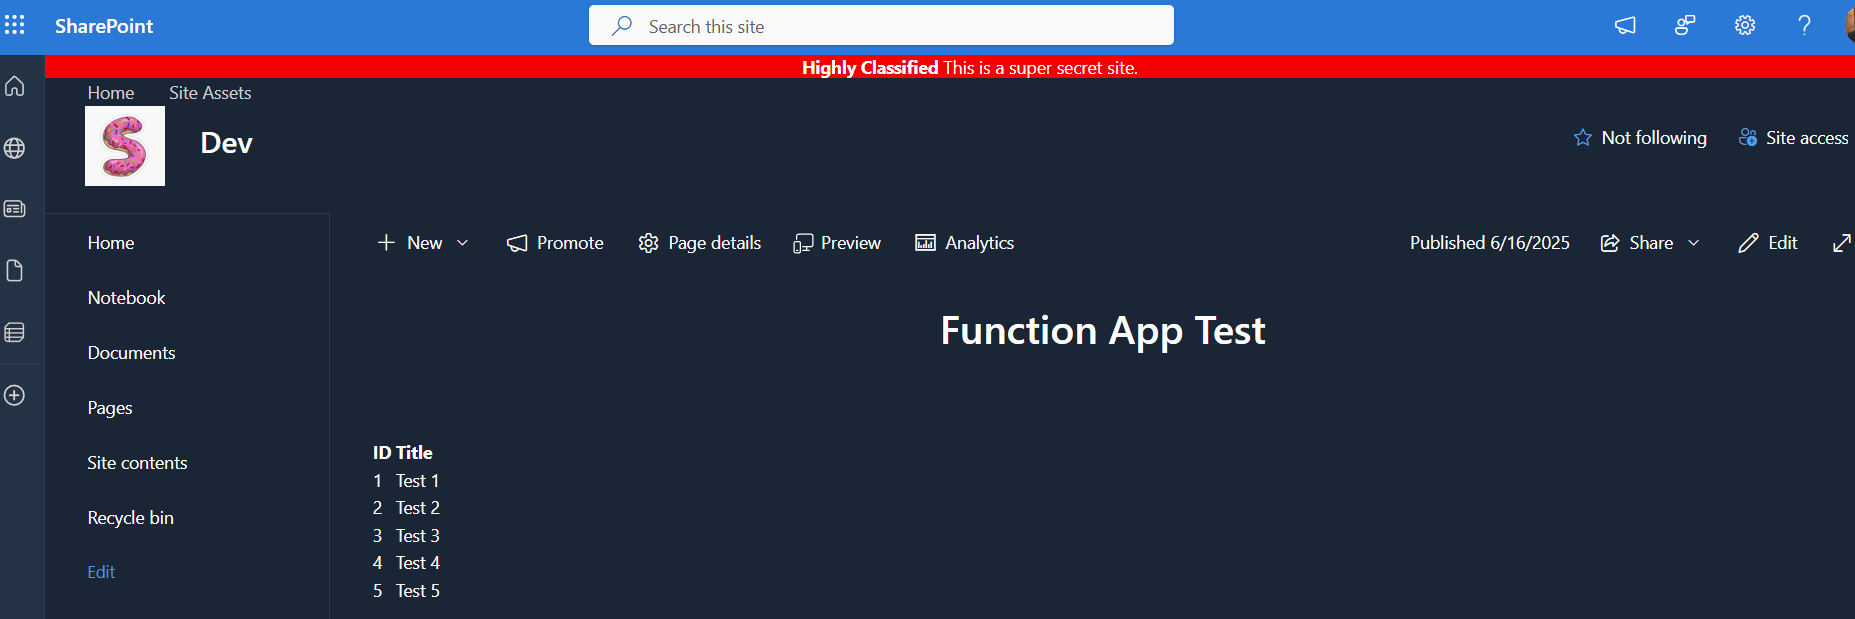
Refresh Workbench
Refreshing the workbench page, you will see the test data displayed.
Securing the API
Now that we have the SPFx solution getting data from the Function App, we can now work to securely call it without the secret key being exposed.
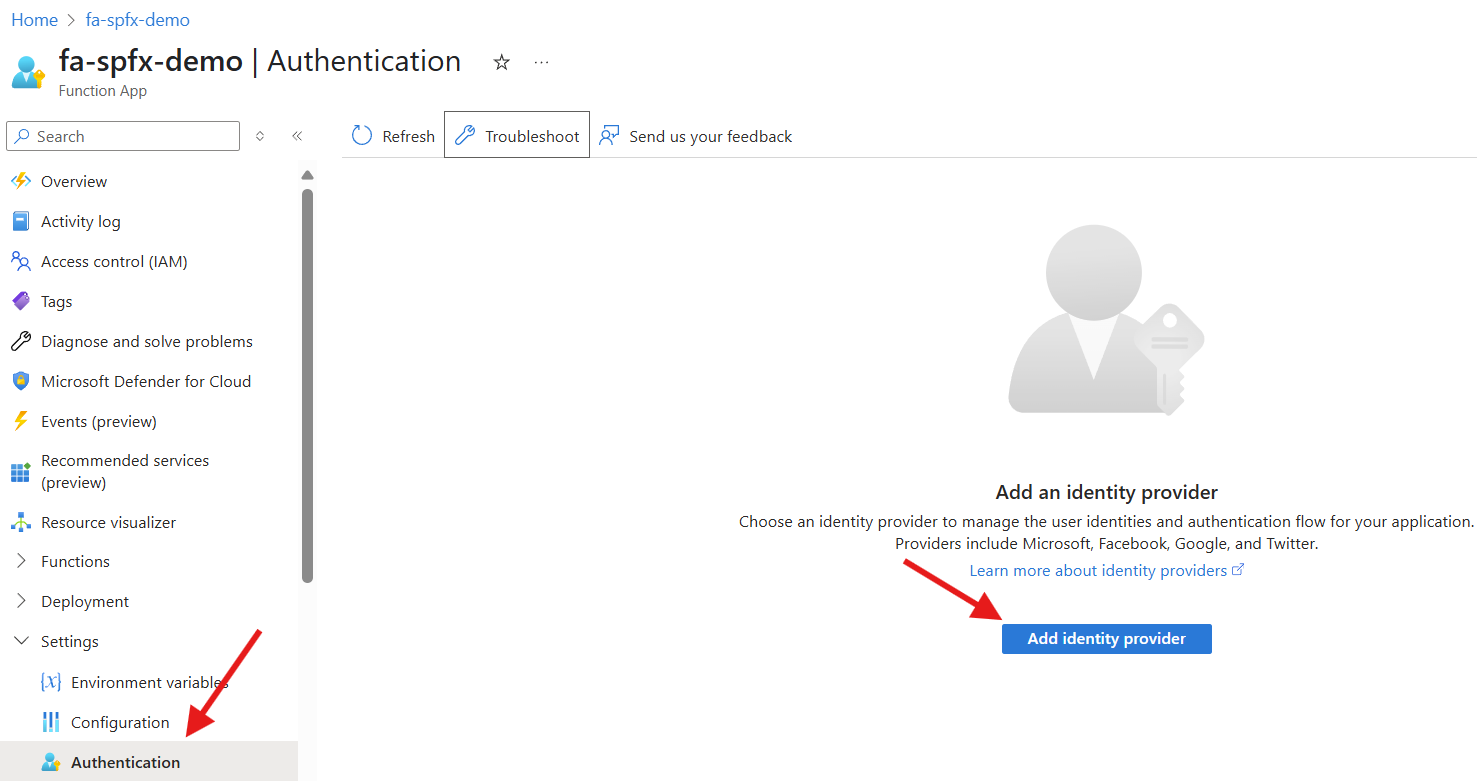
Configure Authentication
- Access the
Function App - Select
Authenticationunder theSettingsmenu - Click on
Add Identity Provider - Select
Microsoftas the identity provider - Select
180 daysfor theClient secret expiration - Update the
Unautenticated requestsproperty toHTTP 401 Unauthorized recommended for APIs - Select
Addto create the application registration
Note - The default name of the application registration will be the same as the function app name.
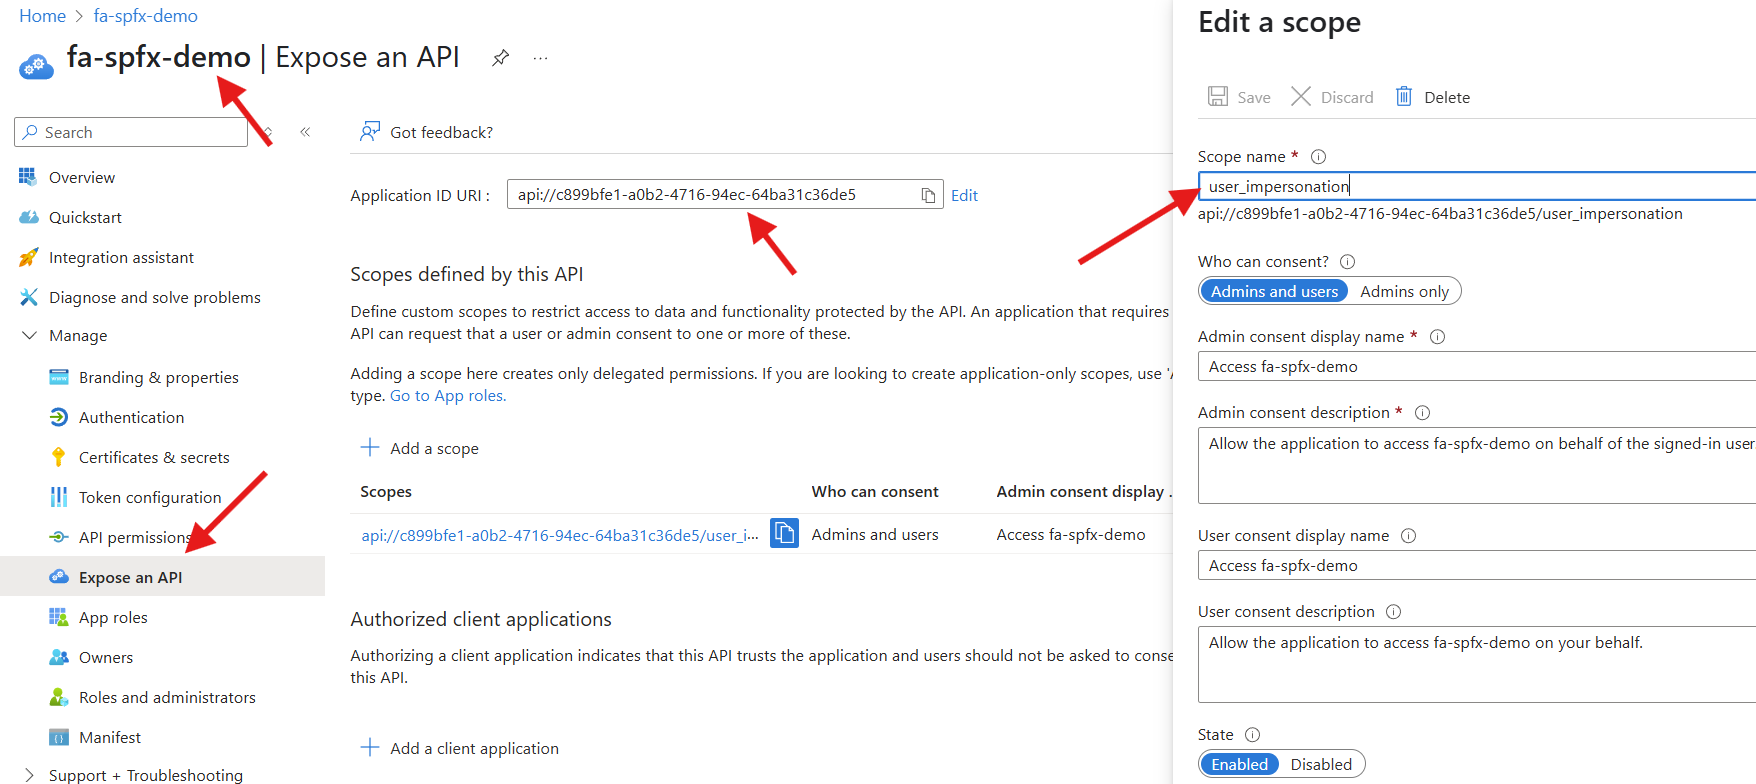
View App Registration
Once the identity provider is created, click on the link to take you to the Entra App Registration it created. Select Expose an api under the Manage menu and note the Application ID URI and Scopes. A scope was created for user_impersonation, which will use the context of the current user to authenticate with Entra. We will need to update the SPFx solution to register this API.
Update SPFx Solution
Currently, we are passing the secret key in the query string of the uri to authenticate the request. This isn’t recommended, since it’s not secured and not supposed to be exposed. We want to use Entra to authenticate the SharePoint user and use their context to call the api.
Update config/package-solution.json
We will use the identity provider’s application registration to authenticate with Entra AD. Select the config/package-solution.json file and add the following under the solution property:
"webApiPermissionRequests": [
  {
    "resource": "fa-spfx-demo",
    "scope": "user_impersonation"
  }
]
Update HTTP Client
To authenticate with Entra AD, we will need to use the AadHttpClient component. Update the reference to the http client.
import { AadHttpClient } from "@microsoft/sp-http";
Update API References
We will need to update the global variables for the http client. We will set the _clientUri reference the application registration’s Application ID URI. This will allow us to get a token from Entra and pass it in the header for authentication to the function app.
export default class HelloFunctionAppWebPart extends BaseClientSideWebPart<IHelloFunctionAppWebPartProps> {
  private _client: AadHttpClient;
  private _clientUri = "api://[Application ID URI]";
  private _faUri = "https://[Function App URI]";
}
Update onInit() Event
Uncomment the onInit event and set the code to create the http client. The onRender event will reference this to make the api calls.
protected onInit(): Promise<void> {
  return new Promise((resolve, reject) => {
    // Get the client
    this.context.aadHttpClientFactory.getClient(this._clientUri)
      .then(client => {
        this._client = client;
        resolve();
      })
      .catch(reject);
  });
}
Update render() Event
We will need to update the http client in the render event to reference the new one.
public render(): void {
  this.domElement.innerHTML = `Loading the data...`;

  // Call the request
  this._client.get(this._faUri, AadHttpClient.configurations.v1)
    .then(resp => {
      return resp.json();
    })
    .then((data: object[]) => {
      this.domElement.innerHTML = `
        <table>
          <thead>
            <tr>
              <th>ID</th>
              <th>Title</th>
            </tr>
          </thead>
          <tbody></tbody>
        </table>
      `;

      // Add the data rows
      const elRows = this.domElement.querySelector("tbody") as HTMLElement;
      data.forEach((item: { Id: string; Title: string }) => {
        // Append a row
        elRows.innerHTML += `
          <tr>
            <td>${item.Id}</td>
            <td>${item.Title}</td>
          </tr>
        `;
      });
    })
    .catch(err => {
      this.domElement.innerHTML = `Error calling the client...`;
      console.error(err);
    })
}
Test SPFx Solution
When creating Web API Permission Requests, the tenant admin will need to be approved in order for the api call to work. We will need to build and deploy the solution to the app catalog in order for the approval to appear in the SharePoint admin center.
- Run
npm run packageto build and create the solution - Access the app catalog
/sites/appcatalog - Upload the solution file from the
sharepoint/solutionsfolder - Check the option to make the solution available immediately Note - This skip the steps to add the app to a site before we are able to access the webpart.
- Click the
Deploybutton to make the webpart available for use - Access a site to test the solution
- Create a site page
- Add the webpart to the page and republish the page Note - If a popup dialog appears, just ignore it and close it.
Approve the API Request
The solution will display an error. Further inspection from the development console, you will notice an error stating that the api hasn’t been approved.
- Access the SharePoint admin center
- Select
API accessunder theAdvancedmenu - Select your api for your SPFx solution and click on
Approve - Refresh the test page
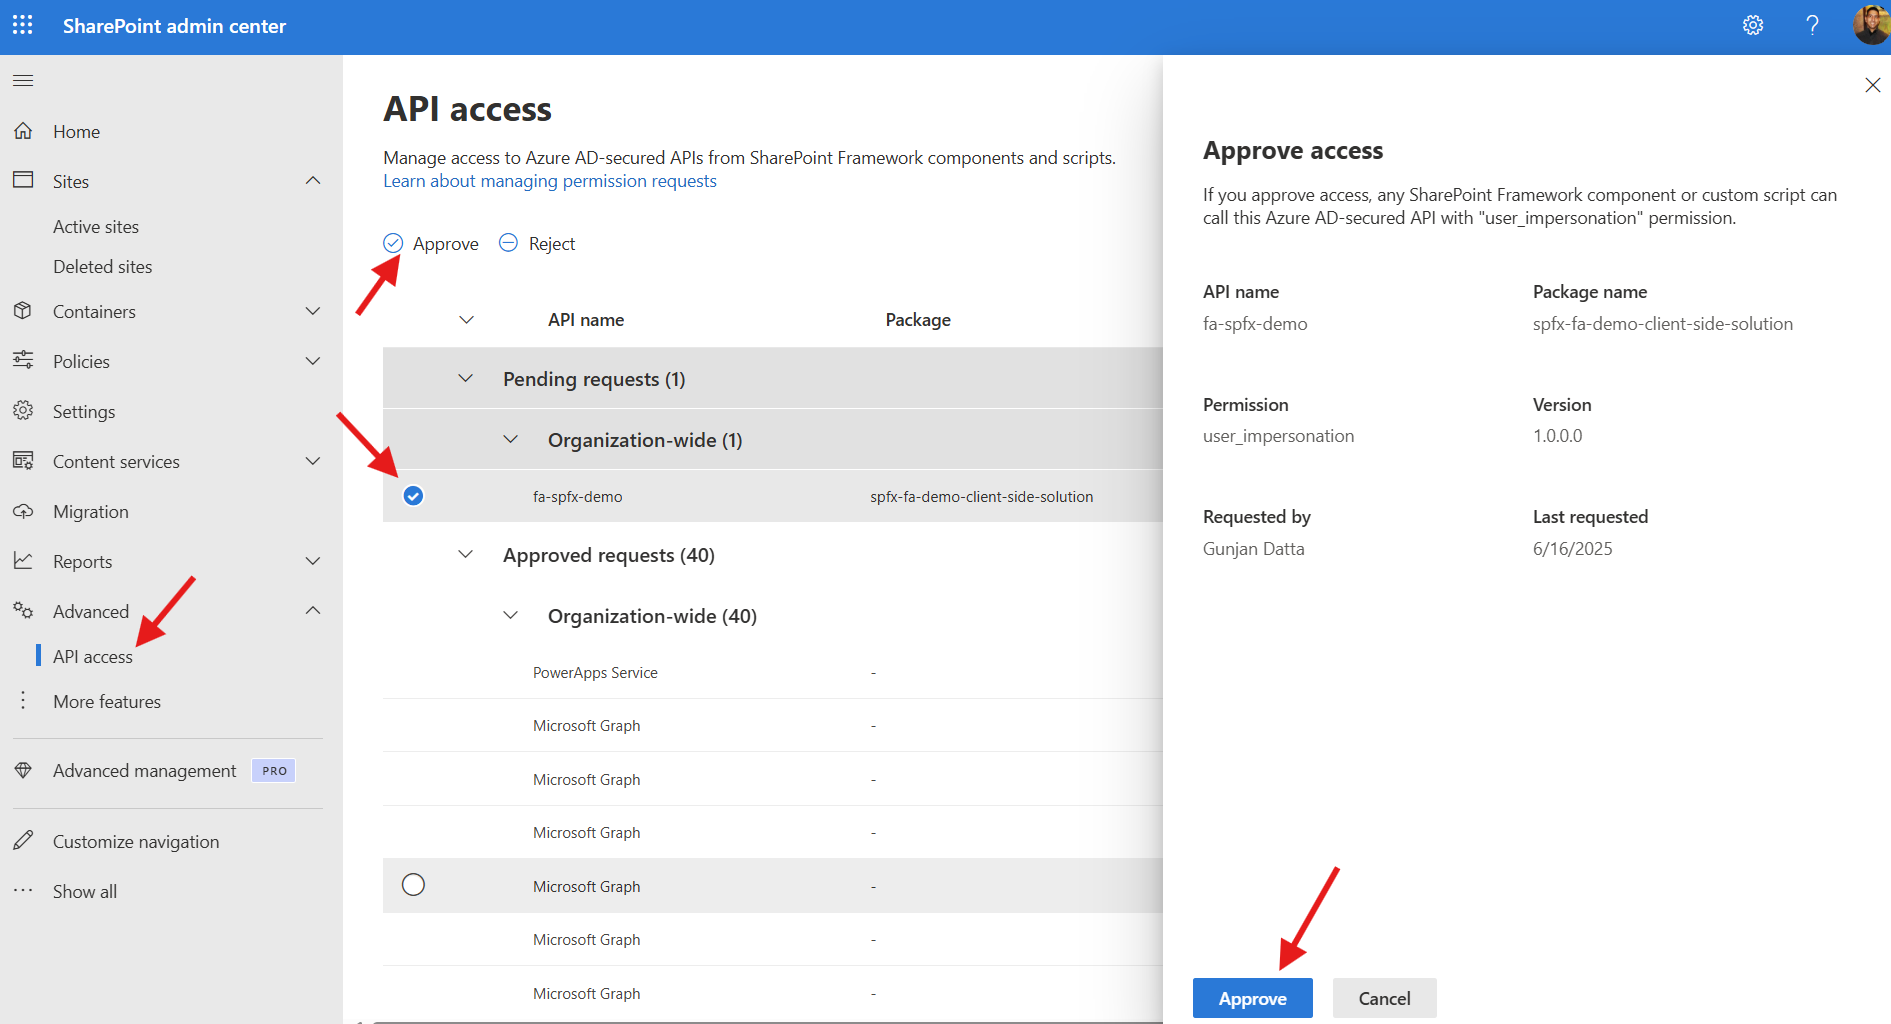
Note - Approving the request will add the api permission to the SharePoint Online Web Client Extensibility application registration. This will allow the getClient method to work from the onInit SPFx event.
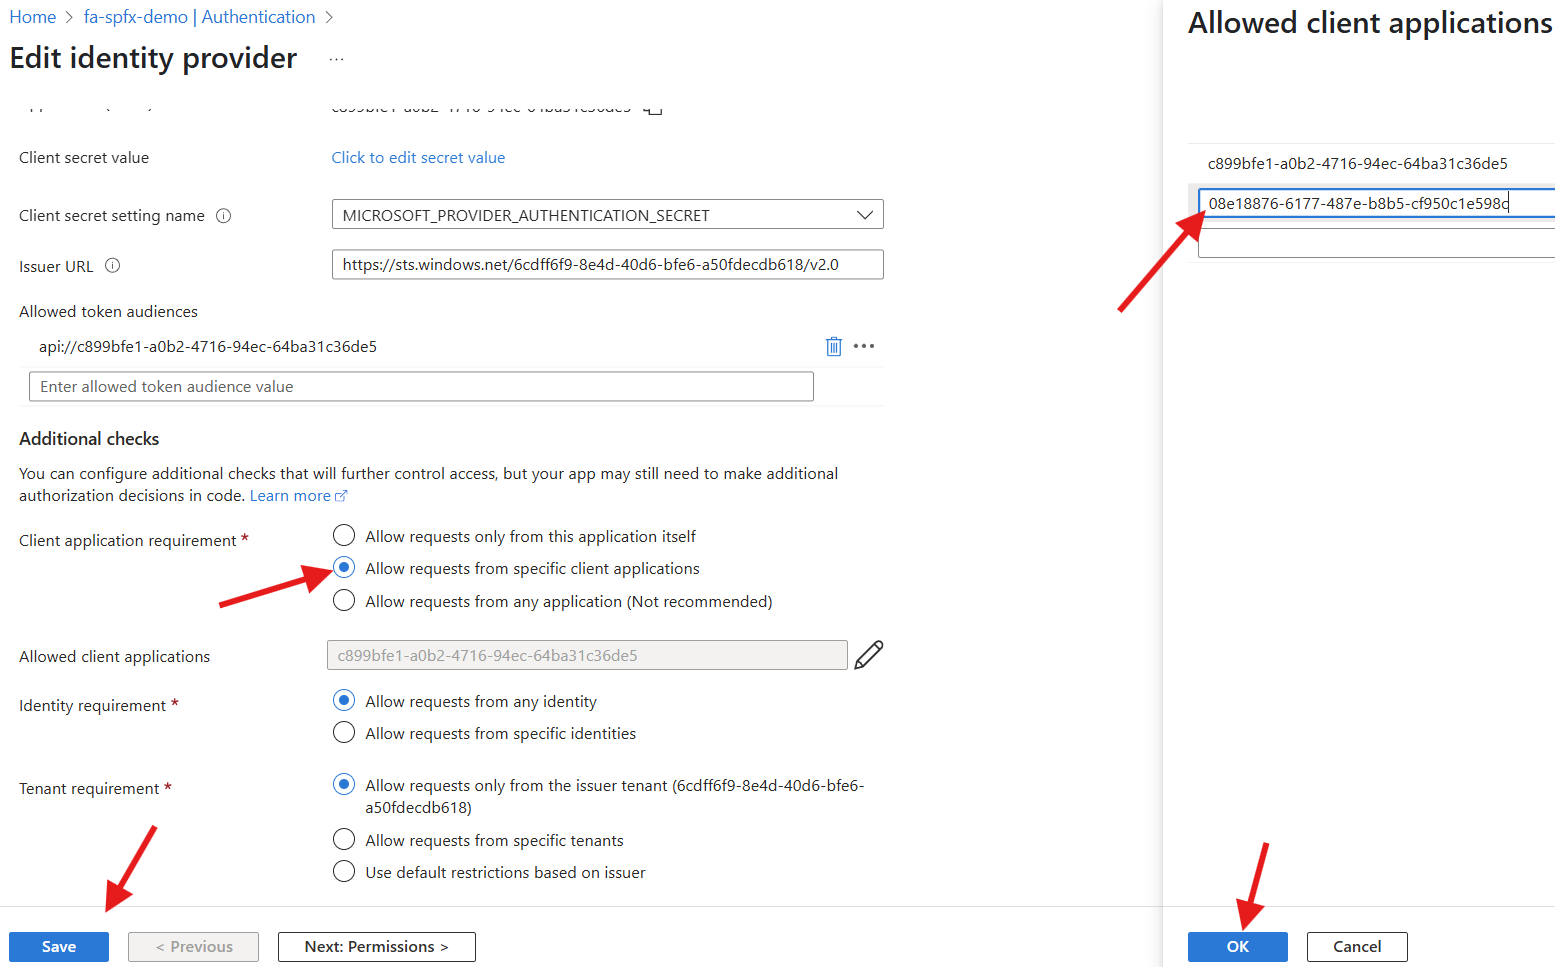
Fix 403 Forbidden Error
The solution will display an error message. Further inspection from the development console, you will notice a 403 Forbidden error when calling the function app. SharePoint has a default application that is used for the web api requests. We will need to update the function app to allow requests from the SharePoint Online Web Client Extensibility application registration. Complete the following:
- Access your azure function
- Click on
Authenticationfrom theSettingsmenu - Update the
Client secret setting nameto-- Remove value (Do not set client secret) -- - Edit the
Identity providerand change theClient application requirementtoAllow requests from specific client applications - Edit the
Allowed client applications - Add the Guid for the
SharePoint Online Web Client Extensibilityapplication registration:08e18876-6177-487e-b8b5-cf950c1e598c - Refresh the test page
Fix 401 Unauthorized Error
The solution will display the same error message still. Further inspection from the development console, you will now notice a 401 Unauthorized error. Now that the API is configured to get a token from Entra and pass it to the azure function, we need to modify the function app’s authorization level.
- Access the azure function
- Click on the
GetTestDatafunction - Select the
Integrationtab - Click on the
HTTP (Request)link underTrigger and inputs - Update the
Authorization leveltoAnonymous
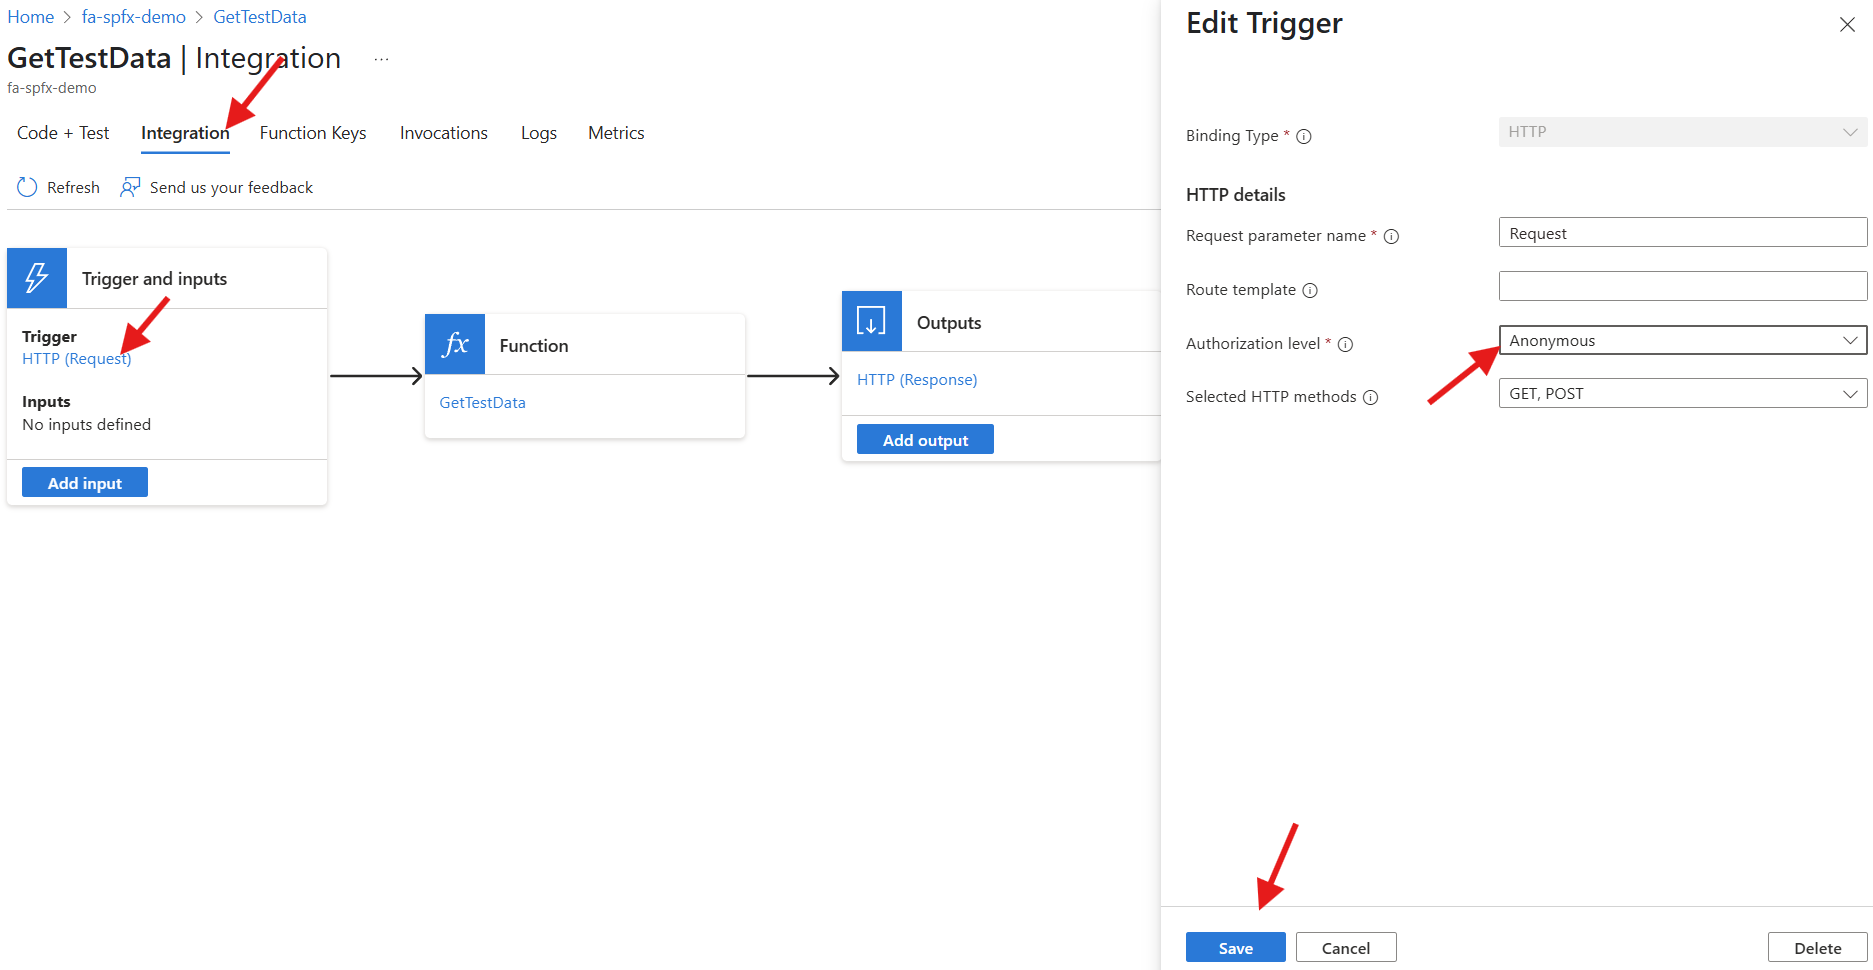
Note - We are already authenticated by Entra, so we don’t need an additional layer of authentication.
Refreshing the test page will display the solution.
Summary
Using Azure Functions will elevate your SPFx solution options. It’s very powerful and very useful. I hope this code example was helpful. Happy Coding!!!