New Taxonomy & List Helper Classes
This blog post will give code examples of the new Taxonomy, ListForm and ListFormField helper classes, available in the gd-sprest library. The source code can be found in github.
Automated Check-In Example
Let’s design a SharePoint 2013 solution, giving an example of automatically checking in a user, when they visit a web. We will use a SharePoint list to contain an item for team members. @JoanneCKlein recently blogged about the use of choice, lookup and managed metadata fields. I recommend reading it for real-cases.
For this blog post, I’ll use a managed metadata field, so I can give code examples of the new Taxonomy, ListForm and ListFormField helper classes.
Project Configuration
This project will use TypeScript and NodeJS.
Create Source
mkdir checkin
cd checkin
npm init --y
Install Libraries
npm i --save gd-sprest
npm i --save-dev core-js webpack
tsconfig.json
{
    "compilerOptions": {
        "lib": [
            "dom",
            "es2015"
        ],
        "outDir": "build",
        "target": "es5"
    }
}
webpack.config.json
var path = require("path");
var webpack = require("webpack");

// WebPack Configuration
module.exports = {
    entry: "./build/index.js",
    output: {
        filename: "check-in.js",
        path: path.resolve(__dirname, "dist")
    }
}
package.json
Update the package.json file and set the “scripts” property.
"scripts": {
    "build": "tsc && webpack"
}
SharePoint Assets (src/cfg.ts)
First thing we will do is create the configuration file to automate the installation of the SharePoint assets.
Reference Library
We will reference the gd-sprest library to automate the installation of the SharePoint assets. I recommend separating out the assets. This will help with testing and debugging the configuration files, as well as making updates. This will also allow you to develop solutions that can target both a site collection or a specific web. We will create a configuration for the list, and a custom action to target a specific web. You can expand on this demo and make a “Site” configuration to work be enabled against any web within a site collection.
import { Helper, SPTypes } from "gd-sprest";
Configuration
/**
 * Configuration
 */
export const Configuration = {
    // List
    List: new Helper.SPConfig({
        ListCfg: [
            {
                ListInformation: {
                    BaseTemplate: SPTypes.ListTemplateType.GenericList,
                    Description: "Sample list for the check-in demo.",
                    Title: "Team Members"
                },
                TitleFieldDisplayName: "Role",
                CustomFields: [
                    // Team Member
                    {
                        name: "TeamMember",
                        title: "Team Member",
                        type: Helper.SPCfgFieldType.User,
                        selectionMode: SPTypes.FieldUserSelectionType.PeopleOnly
                    } as Helper.Types.IFieldInfoUser,
                    // Status
                    {
                        name: "CheckInStatus",
                        title: "Check-In Status",
                        type: Helper.SPCfgFieldType.MMS
                    }
                ],
                ViewInformation: [
                    // Default View
                    {
                        ViewName: "All Items",
                        ViewFields: ["TeamMember", "LinkTitle", "CheckInStatus"]
                    }
                ]
            }
        ]
    }),

    // Web Custom Action
    Web: new Helper.SPConfig({
        CustomActionCfg: {
            Web: [
                {
                    Description: "Enables the automated check-in demo.",
                    Location: "ScriptLink",
                    Name: "CheckInDemo",
                    ScriptSrc: "~site/siteassets/checkin/check-in.js",
                    Title: "Check-In Demo"
                }
            ]
        }
    })
}
DataSource (src/ds.ts)
The datasource will contain static methods related to the interactions between the script and the list.
Import Libraries
We will be using various components from the gd-sprest library.
import { ContextInfo, Helper, List, Types } from "gd-sprest";
Team Member Interface
It’s important to define the item interface, so the intellisense is available. We will extend the list item query result interface, so we only need to define custom fields.
export interface ITeamMemberItem extends Types.SP.IListItemQueryResult {
    CheckInStatus: Types.SP.ComplexTypes.FieldManagedMetadataValue;
    CheckInStatus_0: string;
    TeamMember: Types.SP.ComplexTypes.FieldUserValue;
}
Cache
We will be using the session storage, so we only execute a request to the server once, for each session created.
// Check the cache
checkCache: () => {
        // See if we have already checked in the user
        let status = sessionStorage.getItem("CheckInDemo");
        return status == "Active";
},

// Update the cache
updateCache: () => {
        // Set a flag in the session, so we don't run this on every page load
        sessionStorage.setItem("CheckInDemo", "Active");
}
Get Team Member
This method will be used to query the list and return the item for the current user.
// Get the team member
getTeamMember: (): PromiseLike<ITeamMemberItem> => {
        // Return a promise
        return new Promise((resolve, reject) => {
                // Get the list
                new List("Team Members")
                        // Get the items
                        .Items()
                        // Set the query:
                        // 1) Filter for the current user
                        // 2) Include the hidden MMS status field
                        // 3) Include the user's full name
                        .query({
                                Expand: ["TeamMember"],
                                Filter: "TeamMember eq " + ContextInfo.userId,
                                Select: ["*", "CheckInStatus_0", "TeamMember/Title"]
                        })
                        // Execute the request
                        .execute(items => {
                                // See if the item exists
                                let item = items.results ? items.results[0] as ITeamMemberItem : null;
                                if (item && item.CheckInStatus && item.CheckInStatus_0) {
                                        // Update the MMS label
                                        // Note - The value returned is the lookup id, not the value.
                                        item.CheckInStatus.Label = (item.CheckInStatus_0 || "").split("|")[0];
                                }

                                // Resolve the request
                                resolve(item);
                        });
        });
}
Check-In Team Member
This method will update status of the current user’s item to ‘Active’.
// Check the team member in
checkTeamMemberIn: (item: ITeamMemberItem): PromiseLike<void> => {
        // Return a promise
        return new Promise((resolve, reject) => {
                // Get the status field information
                new Helper.ListFormField({
                        listName: "Team Members",
                        name: "CheckInStatus"
                }).then((fieldInfo: Helper.Types.IListFormMMSFieldInfo) => {
                        // Get the term set data
                        Helper.ListFormField.loadMMSData(fieldInfo).then(terms => {
                                // Convert the terms into a tree object
                                let termSet = Helper.Taxonomy.toObject(terms);

                                // Get the "Active" status
                                let term = Helper.Taxonomy.findByName(termSet, "Active");
                                if (term) {
                                        // Update the status
                                        item.update({
                                                CheckInStatus: Helper.Taxonomy.toFieldValue(term)
                                        }).execute(() => {
                                                // Resolve the promise
                                                resolve();
                                        });
                                }
                        });
                });
        });
}
Main Script
The main script will wait for the “sp.js” script to be loaded, to ensure the Notify and Status classes are available. First we will check the cache to see if we need to run this script. Next, we will get the team member item. If it doesn’t exist, we will display a status message to contact the site administrator to be added. If the item exists and the status is not set to active, then we will check them in. We will display a status message letting them know that they are being checked in, and remove it after it completes. We will dispaly a notification message to validate this to the user. We will create a global reference to the library called “CheckInDemo”, so we can reference the Configuration class.
import "core-js/es6/promise";
import { Configuration } from "./cfg";
import { Datasource } from "./ds";
declare var SP;

/**
 * Check-In Demo
 */
class CheckInDemo {
    // Configuration
    static Configuration = Configuration;

    /**
     * Constructor
     */
    constructor() {
        // Wait for the page to be loaded
        window.addEventListener("load", () => {
            // Wait for the sp.js core script to be loaded, so we can reference the notify and status class
            SP.SOD.executeOrDelayUntilScriptLoaded(() => {
                // Validate the user
                this.validateUser();
            }, "sp.js");
        });
    }

    // Method to validate the user
    private validateUser = () => {
        // Check the cache
        if (Datasource.checkCache()) { return; }

        // Get the user
        Datasource.getTeamMember().then(item => {
            // Ensure the item exists
            if (item) {
                // Ensure the status is active
                let status = (item.CheckInStatus ? item.CheckInStatus.Label : "").toLowerCase();
                if (status != "active") {
                    // Display a status
                    let statusId = SP.UI.Status.addStatus("Checking In", "Welcome " + item.TeamMember.Title + ", we are checking you in.");
                    SP.UI.Status.setStatusPriColor(statusId, "yellow");

                    // Check the user in
                    Datasource.checkTeamMemberIn(item).then(() => {
                        // Clear the statuses
                        SP.UI.Status.removeStatus(statusId);

                        // Display a notification
                        SP.UI.Notify.addNotification("Thank you for checking in.");

                        // Update the session
                        Datasource.updateCache();
                    });
                }
            } else {
                // Display a status
                let statusId = SP.UI.Status.addStatus("Unknown Team Member", "Please contact the site admin to be added to the team member list.");
                SP.UI.Status.setStatusPriColor(statusId, "red");
            }
        });
    }
}

// Make the class available globally
window["CheckInDemo"] = CheckInDemo;

// Create an instance of the class
new CheckInDemo();
Demo
I will use SharePoint Online to demo this solution. Make sure you are in Classic Mode for this solution to work. This code example can be used in the SharePoint Framework (SPFx) to target modern webs and pages.
Build the Project
npm run build
Copy File
- Access SharePoint
- This example will use the “Site Assets” library to store the check-in.js file
Install the Solution
- Open the developer tools (F-12)
- Access the console window
- Add the script
var s = document.createElement("script");
s.src = "/sites/dev/siteassets/checkin/check-in.js";
document.head.appendChild(s);
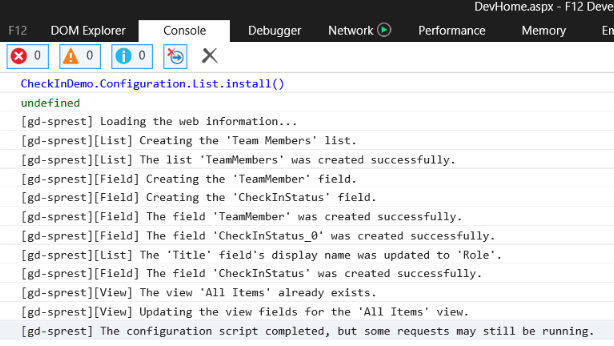
 4. Install the List
CheckInDemo.Configuration.List.install()
 5. Install the Custom Action
CheckInDemo.Configuration.Web.install()
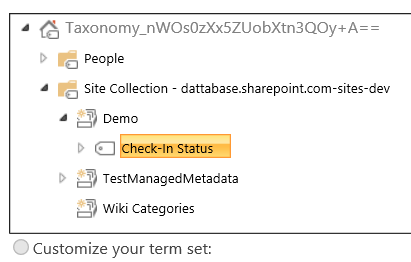
 6. Access the “Team Members” List Settings 7. Edit the Check-In Status Field 8. Select the Term Set I’ve gone ahead and created a term set in the site collection’s term group.
Solution
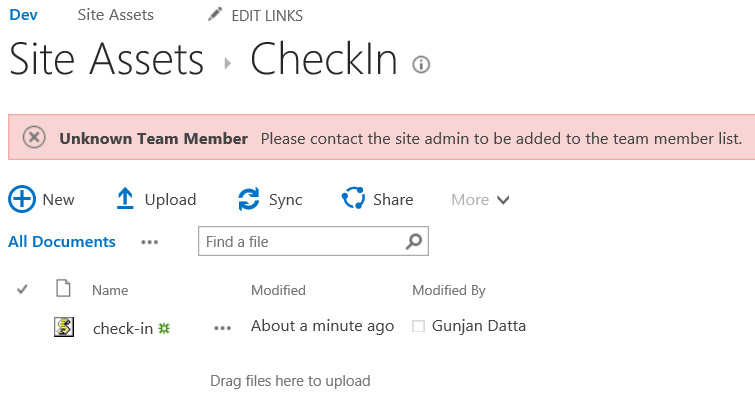
- Refresh the page, and you should see an alert
- Access the list
- Add an item
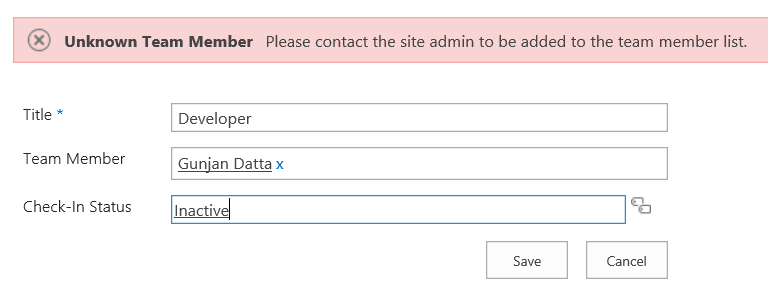
- After the page refreshes, you should see an alert saying it’s checking you in
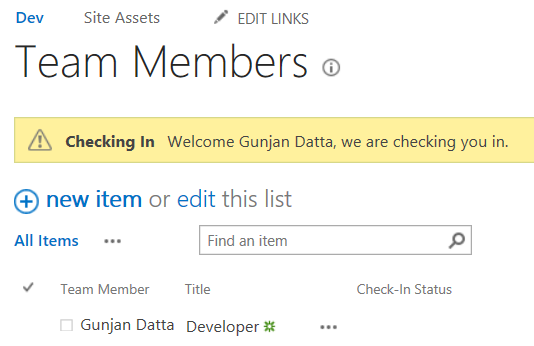
- This will disappear after the item is updated, displaying a notification saying you are checked in
