Deploying a React Project to SharePoint
This post will give an overview of how to deploy the projects created in various blog posts to SharePoint 2013/Online. For this post we will reference the React/Redux project. The code reference is available at github. We will also reference JSLinks from a previous blog post as part of the solution.
I wrote an article to focus on the JSLink portion of this post. You can refer to this article if you only wish to know how to customize list views using JSLinks.
Overview
I wanted to give a recommended solution for deploying projects to SharePoint 2013 where the App Model is not allowed for whatever reason. The more tools in the toolbox, the better. The solution will go over the following:
- Deployment
- Displaying in a Web
- Displaying in a Sub-Web
Deployment - Code Updates
We will be using the gd-sprest library to write helper scripts for the administrator. Referencing the src folder structure of the React/Redux project:
- actions - The project actions
- components - The project components
- data - The data source methods
- reducers - The redux reducers
- store - The redux store
We will add a new folder: scripts
Script Reference
After creating the scripts folder, create the index.js with the code shown below. The code is importing the “ListHelper” class from a file called “list.js”. We will export an instance of the “ListHelper” object as “List”.
index.js
import {ListHelper} from "./list";
export const Scripts = {
    List: new ListHelper()
};
createList Helper Method
We will create a script template that will give a basic example of creating a list with custom field(s) and view. The assets url will be the reference of the JSLink file the list view will reference.
list.js - Create List
import {List, Web} from "gd-sprest";

/**
 * List Helper Class
 **/
export class ListHelper {
    // Method to create the list
    createList(listName, assetsUrl) {
        // Get the list
        (new List(listName))
            // Execute the request
            .execute((list) => {
                // See if it exists
                if(list.existsFl) {
                    // Create the fields
                    this.createFields(list);

                    // Create the view
                    this.createView(list, assetsUrl);
                    return;
                }

                // Set the list name
                let listNameNoSpaces = listName.replace(/\s/g, "");

                // Get the current web
                (new Web())
                    // Get the lists
                    .Lists()
                    // Add a list
                    .add({
                        BaseTemplate: 100,
                        Description: "The description of the custom list.",
                        Title: listNameNoSpaces
                    })
                    // Execute the request
                    .execute((list) => {
                        // Update the title
                        list.update({
                            Title: listName
                        })
                        // Execute the request
                        .execute(() => {
                            // Create the fields
                            this.createFields(list);

                            // Create the view
                            this.createView(list, assetsUrl);
                        });

                        // Wait for the requests to complete
                        list.done(() => {
                            // Log
                            console.log("List created successfully.");
                        });
                    });
            });
    }
}
list.js - Create Fields
    // Method to create the fields
    createFields(list) {
        // Get the list
        list = typeof(list) === "string" ? new $REST.List(list).execute() : list;

        // Get the fields
        list.Fields().execute((fields) => {
            // Define the custom fields
            var customFields = [
                {
                    Name: "CustomField",
                    SchemaXml: '<Field ID="{38C5A21D-F68A-49A1-9326-601720578310}" Name="CustomField" StaticName="CustomField" DisplayName="Custom Field" Type="Text" />'
                }
            ];

            // Parse the custom fields
            for(var i=0; i<fields.results.length; i++) {
                var counter = 0;
                var field = fields.results[i];

                // Parse the custom fields
                for(var j=0; j<customFields.length; j++) {
                    var customField = customFields[j];

                    // See if this the field we are looking for
                    if(customField.Name == field.InternalName) {
                        // Update the counter
                        counter++;

                        // Set the field
                        customFields[j].field = field;

                        // Break from the loop
                        break;
                    }
                }

                // See if we found all the fields
                if(counter == customFields.length) {
                    // Log
                    console.log("Custom fields already exist.");
                    return;
                }
            }

            // Parse the custom fields
            for(var i=0; i<customFields.length; i++) {
                // See if the field exists
                if(customFields[i].field) { continue; }

                // Create the field
                list.Fields().createFieldAsXml(customFields[i].SchemaXml)
                    // Execute the request but wait for the previous request to complete
                    .execute(true);
            }

            // Wait for the requests to complete
            list.done(() => {
                // Log
                console.log("Fields created...");
            });
        }, true);
    }
list.js - Create View
    // Method to create the view
    createView(list, assetsUrl) {
        // Trim the assets url
        assetsUrl = assetsUrl[assetsUrl.length-1] == "/" ? assetsUrl.substr(0, assetsUrl.length-1) : assetsUrl;

        // Get the list
        list = typeof(list) === "string" ? new $REST.List(list).execute() : list;

        // Get the view
        list.Views().execute((views) => {
            var existsFl = false;

            // Parse the views
            for(var i=0; i<views.results.length; i++) {
                var view = views.results[i];

                // See if the view exists
                if(view.Name == "My Project") {
                    // Set the flag
                    existsFl = true;
                    return;
                }
            }

            // Create the 'My Project' view
            list.Views().add({
                JSLink: assetsUrl + "/bundle.js|" + assetsUrl + "/jslink.js",
                Title: "My Project",
                ViewQuery: '[CAML Query]'
            }).execute((view) => {
                // Add the view fields
                $REST.Helper.List.addViewFields(view, ["ID", "Title", "CustomField"])
                // Wait for it to complete
                .done(() => {
                    // Log
                    console.log(view.existsFl ? "View was created successfully." : "Error creating the view");
                });
            });
        }, true);
    }
Update React Project
Next we will update the main index.js file of the react project. We are going to create a global module for the project. This will give flexibility for it to be referenced from a SharePoint webpart.
index.js
import React from "react";
import {render} from "react-dom";
import {Provider} from "react-redux";
import configureStore from "./store/configureStore";
import Dashboard from "./components/dashboard";
import * as listActions from "./actions/listActions";

// Added two new references
import {ContextInfo} from "gd-sprest";
import {Scripts} from "./scripts";

// Create the store
const store = configureStore();

/**
 * My Project
 **/
 class MyProject {
    // Initialization Method
    init(data, elementId, webUrl) {
        // See if the SharePoint environment exists (aka _spPageContextInfo exists)
        if(ContextInfo.existsFl) {
            // Render the component
            this.renderComponent(data, elementId, webUrl);
        } else {
            // Add a "load" event
            window.addEventListener("load", () => { this.renderComponent(data, elementId, webUrl); });
        }
    }

    // Render the component
    renderComponent(data, elementId, webUrl) {
        // Load the data
        store.dispatch(listActions.loadItems(data, webUrl));

        // Get the element to render the component to and find the webpart containing this item
        let targetElement = document.getElementById(elementId);
        if(targetElement) {
            // Render the app
            render(
                <Provider store={store}>
                    <Dashboard />
                </Provider>,
                targetElement
            );
        };
    }

    // The reference to the "Script" module we wrote
    get Scripts() { return Scripts; }
}

// Make the class globally available
window["MyProject"] = new MyProject();
Deployment - SharePoint
Now that the code updates are complete, we will go over the deployment steps of SharePoint. Now that we have a script available to use, we can easily reference it and create the project assets easily.
Step 1. Copy Files To Root Web
The first step is pretty simple, copy the files to SharePoint. We will use the “Style Library” in the root web of the site collection. Create a folder called “MyProject” and copy the “bundle.js” output file to it.
Step 2. Load the bundle.js Script
Refresh the page, and press F-12 to open the browser development tools. Select the “Console” tab and load the script.
Load the script
There is no need to create a page in order to reference it. You can load it on demand by typing the following in the browser console:
var script = document.createElement("script");
script.src = "[Relative Url to 'bundle.js' File]";
document.head.appendChild(script);
Step 3. Create the Project Assets
Now that the script is available, we can now create the list by accessing the global “MyProject” variable. The url passed to the method is for the JSLink reference.
Create the List
window.MyProject.Scripts.List.createList("My List", "~sitecollection/Style Library/MyProject");
Note - You may get a security error if you run this on a system page in a SharePoint Online environment. If you do, go to the homepage and run it from there.
Upgrades
As the project grows, you can create various classes for upgrading to newer versions. This would be similar to the wsp way of writing feature upgrades.
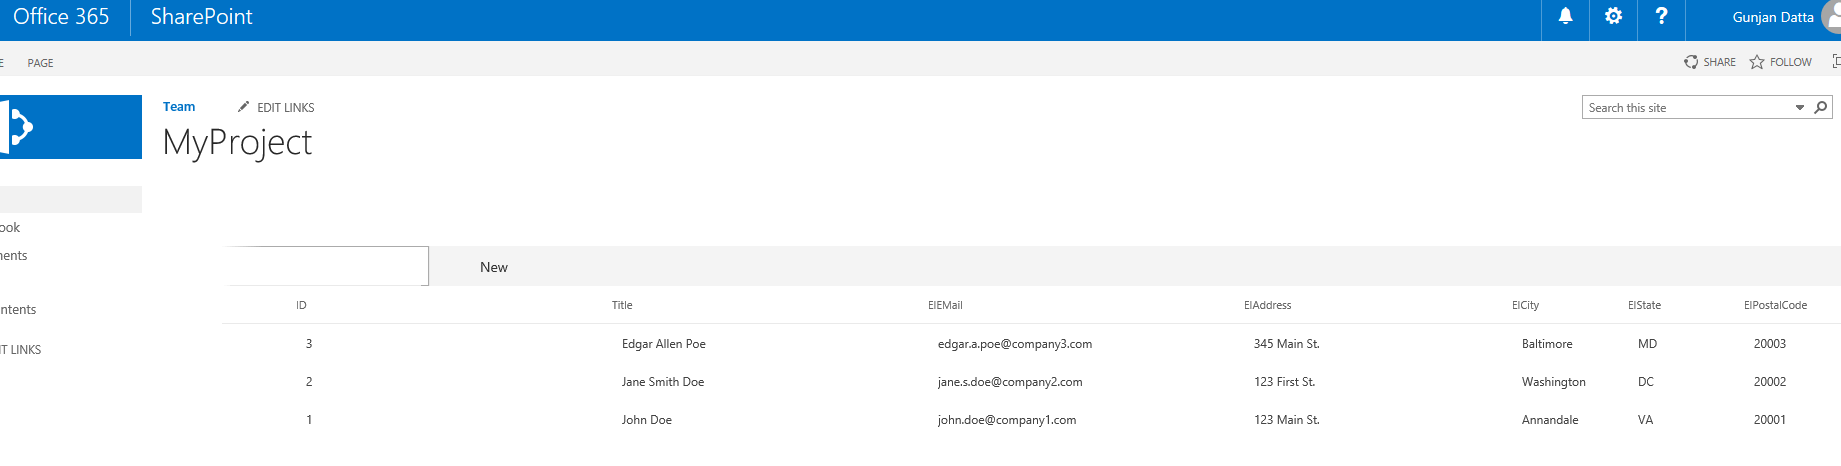
Step 4. Validate List View
It’s always best practice to validate the list, custom fields and view were created successfully.
Displaying in a Web
The custom view created uses the JSLink property to reference a javascript file to override the Client-Side Rendering (CSR) of the list view. Reference the JSLinks from a previous blog for additional information on this subject.
Loading the Scripts
The code to create the view, shown below, sets the “JSLink” property to loads the project’s “bundle.js” output file first, then the jslink.js file. The jslink file will be used to register the list view CSR override. Similar to the “List” helper class, we will create a JSLink class to make the use of it easier.
Reference to Create View Code
// Create the view
list.Views().add({
        JSLink: assetsUrl + "/bundle.js|" + assetsUrl + "jslink/.js",
        Title: "[Custom View Name]",
        ViewQuery: '[CAML Query]'
}).execute(function(view) {
        // Add the view fields
        $REST.Helper.List.addViewFields(view, ["ID", "Title", "CustomField"])
        // Wait for it to complete
        .done(function() {
                // Log
                console.log(view.existsFl ? "View was created successfully." : "Error creating the view");
        });
});
Code Updates
The code updates of the previous post took care of the heavy lifting, so all we need to do is create the JSLink helper class. Add this file to the “scripts” folder. I’ve recommended to use JSLinks, since we can easily override a view to display the project while using OTB SharePoint webparts. This method will allow the user to customize the data using the OTB List View webpart they are already used to.
index.js - Scripts Module Update
import {CSR_MyProject} from "./jslink";
import {ListHelper} from "./list";
export const Scripts = {
    JSLink: CSR_MyProject,
    List: new ListHelper()
};
jslink.js - JSLink Helper Class
This class will use the “JSLink” helper class from the gd-sprest library.
import {JSLink} from "gd-sprest";

/**
 * CSR Override for MyProject List View
 **/
export class CSR_MyProject {
    // Initialization
    init() {
        // Create the jslink object
        let jsLink = new JSLink();

        // Set the CSR Template overrides
        jsLink.Templates = {
            // Header
            Header: (ctx) => { return ""; },
            // Body
            Body: (ctx) => { return "<div id='myProject'></div>"; },
            // Footer
            Footer: (ctx) => { return this.renderFooter(ctx); }
        };

        // Register the template override
        jsLink.register();
    }

    // Footer
    renderFooter(ctx) {
        // Initialize my project which is globally available
        // Note - We are sending the list data from the context. This way we can use the OTB List View webpart to control the data sent to it.
        window["MyProject"].init(ctx.ListData, "myProject");

        // Display nothing
        return "";
    }
}
jslink.js
This is the file the list view’s JSLink property is referencing. It will be uploaded to the “MyProject” folder we created in the “Style Library” of the root web.
"use strict"

// Write the javascript to initialize the JSLink script we just wrote. We are writing it to the page to ensure it's executed if MDS is enabled
document.write("<script type='text/javascript'>(function() { new window.MyProject.Scripts.JSLink(); })();</script>");
Validate the List View
Accessing the list view, you should see the project displayed. 
Deploying to a Sub-Web
SharePoint does not display lists and libraries from parent webs in sub-webs. The code updates will allow us to use the Script Editor webpart to reference the project and load the data.
Step 1. Access Sub-Web
Access a sub-web of the site collection containing the solution.
Step 2. Edit a Page
Edit a webpart or wiki page.
Step 3. Add the Script Editor WebPart
From the “Media and Content” category, select the “Script Editor” webpart.
Step 4. Add Code
The JSLink class calls the init method with the list items. The code updates of the project included an update to the “loadData” action of the project. It passes a “data” object which will be the list title or items. The script editor will pass the list name to target. This logic will not allow the user to control the data source using the OTB SharePoint list view webpart.
<script type="text/javascript" src="[relative url to the bundle file]"></script>
<div id="myProject"></div>
<script type="text/javascript">
window.MyProject.init("My List", "myProject", "[relative url of the root web]");
</script>
Step 5. Validate the WebPart