React SharePoint JSLink Starter Project
This post will give an overview of the React SharePoint JSLink starter project. Please refer to previous blog posts for additional information on React and JSLinks. The code for this post can be found on github. This project template can be used in SharePoint 2013+ environments.
File/Folder Structure
- dist - The compiler output.
- node_modules - Associated project libraries.
- src - The source code
- package.json - The npm configuration file.
- tsconfig.json - The TypeScript configuration file.
- webpack.config.js - The WebPack configuration file.
Project Overview
The starter project gives sample code for creating jslink files to customize SharePoint list forms and views. I will go over the sample code and explain how to apply customizations. This starter project has been based off of the concepts in this previous blog post, so I recommend reading it as a prerequisites if you are new to Client-Side Rendering (CSR).
WebPack Configuration (webpack.config.js)
It’s important to note the “entry” and “output” properties of the webpack configuration file. It doesn’t make much sense to create a NodeJS project for each JSLink file. WebPack allows us to generate multiple output files for each entry point.
Single File The dist folder will contain one file called “jslink_template.js”.
    // File(s) to target
    entry: {
        template: "./template.tsx",
    },

    // Output
    output: {
        // Filename
        filename: "jslink_[name].js",
        // Folder
        path: path.join(__dirname, "dist")
    },
Multiple Files The dist folder will contain two files called: “jslink_chartView.js” and “jslink_tableView.js”.
    // File(s) to target
    entry: {
        chart: "./chartView.tsx",
        table: "./tableView.tsx"
    },

    // Output
    output: {
        // Filename
        filename: "jslink_[name].js",
        // Folder
        path: path.join(__dirname, "dist")
    },
Template File (src/template.tsx)
The template file contains the code to override the list view templates. I’ll break out the code file and explain it by each function.
Initialization The initialization method will create an instance of the JSLink object, a helper class from the gd-sprest library. The “id” property should be updated based on the class or file name. This sample code will override a list view’s Header, Body and Footer templates.
/**
 * JSLink Helper Class
 */
class JSLinkDemo {
    private id = "template";
    private static viewIds = {};

    // Initialization
    init() {
        // Register the JSLink template(s)
        Helper.JSLink.register({
            Templates: {
                // Render the body
                Body: this.renderBody,
                // Render the footer
                Footer: this.renderFooter,
                // Clear the header
                Header: this.renderHeader
            }
        });
    }
Render Header The sample code below will ensure the we customize the correct list view webpart. You can run into issues when applying multiple list view webparts on the same page. The code below will query the current view and check the JSLink property to ensure we apply the customization to the correct list view webpart. I’m not a huge fan of this current solution, since the call is synchronous. We must return the html to override the template, so there isn’t much of a choice here. If we don’t have the correct webpart, then we will return the default html for the header template. Otherwise we will return an empty div element with a unique id. The global “id” variable will be used along w/ the webpart id to ensure we set have unique id. The “viewIds” array will be updated with the unique view id, which is referenced by the other methods.
    // Method to render the header
    private renderHeader = (ctx) => {
        // Get the list
        // Note - Not a fan of this synchronous request, but looking into a better solution.
        // Note - This is only needed if you are going to use >1 instance of this view on a wiki/webpart page.
        let view = (new List(ctx.ListTitle))
            // Get the view
            .Views(ctx.view)
            // Execute the request
            .executeAndWait();

        // Determine if this list is targeting this library
        if(view.JSLink.toLowerCase().indexOf("jslink_" + this.id + ".js") < 0) {
            // Render the default header
            return RenderHeaderTemplate(ctx);
        }

        // Save a reference to this view
        JSLinkDemo.viewIds[ctx.view] = true;

        // Render the element to render the chart to
        return "<div id='" + this.id + "_" + ctx.wpq + "'></div>";
    };
}
Render Body The render body method will check the global “viewIds” array for the current view id. If it contains it we will return nothing, since we are using React to render the custom component in the footer template override. Otherwise we will return the default html of the body template.
    // Method to render the body
    private renderBody = (ctx) => {
        // Render the body
        return JSLinkDemo.viewIds[ctx.view] ? "" : RenderBodyTemplate(ctx);
    };
Render Footer The render footer method will query for the div element created in the header template. You are probably asking why I didn’t do this in the “renderBody” method, which is exactly what I did try. The element may not exist at that point, but is available by the time we hit the footer template override. If the div element exists then we will render the custom “ListView” react component to it, otherwise return the default html of the footer template.
    // Method to render the footer
    private renderFooter = (ctx) => {
        // Get the target element
        let el = document.querySelector("#" + this.id + "_" + ctx.wpq);
        if(el) {
            // Render the list view
            render(<ListView data={ctx.ListData.Row} wpId={ctx.wpq} />, el);
            return "";
        }

        // Render the default footer
        return RenderFooterTemplate(ctx);
    };
Data Source Notice that we are passing “ctx.ListData.Row” to the component as a property. This object contains the list view items that are displayed on the page. Utilizing the default list view data source will allow the user to customize a list view using the out-of-the-box methods they are used to. It’s important to note that you shouldn’t group items and increase the total number to ensure paging is not enabled. This will give us all the data in one request to the server, which is handled by SharePoint.
render(<ListView data={ctx.ListData.Row} wpId={ctx.wpq} />, el);
Client-Side Rendering (CSR) Override To apply the CSR override, we will create a global variable for this class. The reason I’m making this check, is in the case we have multiple instances of the same list view webpart on the page. For example, let’s say you make a generic chart for a list view which can be used to visualize the data in a chart. If the user adds two instances of the same list view webpart targeting different datasets on a webpart page, you will need to add additional code to prevent a conflict. By design, you only need to register a CSR once since it will run for each list view webpart based on the CSR template override values. A previous blog post goes into further details of the available template overrides.
// Ensure this class is available globally
if(window["JSLinkDemo"] == null) {
    // Make the class available globally
    window["JSLinkDemo"] = new JSLinkDemo();

    // Add the scripts
    window["JSLinkDemo"].Scripts = Scripts;

    // Write the js to initialize the CSR override. This will ensure it works w/ MDS.
    document.write("<script type='text/javascript'>(function() { JSLinkDemo.init(); })()</script>");
}
Components (src/components/listView.tsx)
The sample code gives a basic “Hello World” example of generating sample data. The “Props” interface gives us intellisense and compile errors if the incorrect properties are used. The render method will display a table which calls the “generateRows” method to create the html table rows. It’s important to note that the “key” property is required if you generate react components dynamically.
/**
 * Properties
 */
declare interface Props {
    data: Array<any>,
    wpId: string
}

/**
 * List View
 */
export class ListView extends React.Component<Props, any> {
    // Method to generate the table rows
    generateRows = () => {
        let rows = [];

        // Parse the data
        for(let i=0; i<this.props.data.length; i++) {
            let item = this.props.data[i];

            // Add the row
            rows.push(
                <tr id={item.ID} key={"template_row_" + i}>
                    <td>{item.ID}</td>
                    <td>{item.Title}</td>
                </tr>
            );
        }

        // Return the rows
        return rows;
    }

    // Render the component
    render() {
        return (
            <div>
                <h1>My Custom Component</h1>
                <p>The list has {this.props.data.length} items.</p>
                <table>
                    <thead>
                        <th>ID</th>
                        <th>Title</th>
                    </thead>
                    <tbody>
                        {this.generateRows()}
                    </tbody>
                </table>
            </div>
        );
    }
};
Scripts (src/scripts/view.ts)
This sample code isn’t required, but comes in handy for a manual deployment. This view helper class will allow you to set and clear the JSLink property of a view using the console window of the browser. It uses the gd-sprest library to get the list view and update the JSLink property. The JSLink property for Content Types and Views are not available through the GUI, so you will need to use code to update the JSLink property.
import { List } from "gd-sprest";

/**
 * Configuration
 */
export class ViewHelper {
    /**
     * Method to clear the jslink property.
     * @param listName - The list name to update.
     * @param viewName - The view name to update.
     */
    clearJSLink(listName: string, viewName: string) {
        // Uninstall the JSL
        return this.setJSLink(listName, viewName, "");
    }

    /**
     * Method to update a list view.
     * @param listName - The list name to update.
     * @param viewName - The view name to update.
     * @param jsLinkUrl - The JSLink property value.
     */
    setJSLink(listName: string, viewName: string, jsLinkUrl: string) {
        // Get the list
        (new List(listName))
            // Get the views
            .Views()
            // Get the view
            .getByTitle(viewName)
            // Execute the request
            .execute(view => {
                // Ensure the view exists
                if (view.existsFl) {
                    // Update the JSLink property
                    view.update({
                        JSLink: jsLinkUrl
                    }).execute(() => {
                        // Log to the console
                        console.log("[JSLink] The JSLink property was updated for view '" + viewName + "' in list '" + listName + "'.");
                    });
                } else {
                    // Log to the console
                    console.log("[JSLink] The view '" + viewName + "' does not exist in list '" + listName + "'.");
                }
            });
    }
}
Deployment Steps
This section will go over the deployment steps for testing this CSR override.
Compile the Project
Once you compile the project by running “npm run build” or “webpack”, the bundled output file will be available in the “dist” folder of the project.
Upload Assets to SharePoint
For this demo, I’ll copy the “jslink_template.js” file to the “Site Assets” library and put it in the “JSLink” sub-folder.
Target List Information
For this demo, I’ve created a “Dev” list and a “Dev” view with sample data. This information is required for the next steps, since we need a list and view to apply this customization to. The relative url of the site I’m using is “/sites/dev”.
Open Browser Console Window
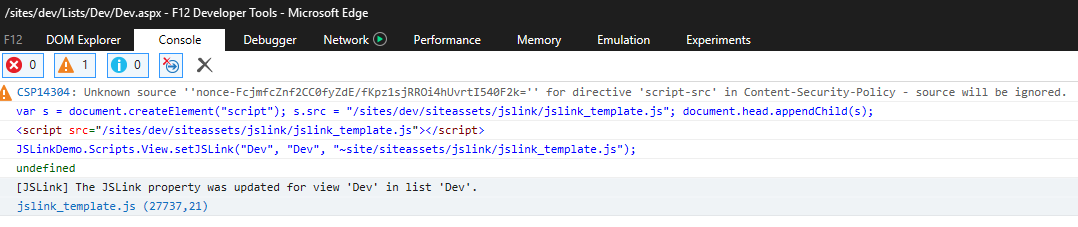
After uploading the file, press the “F-12” key to view the developer tools. The following code will load the library and update the list view’s JSLink property to load our script.
var s = document.createElement("script"); s.src = "/sites/dev/siteassets/jslink/jslink_template.js"; document.head.appendChild(s);
JSLinkDemo.Scripts.View.setJSLink("Dev", "Dev", "~site/siteassets/jslink/jslink_template.js");
Test Customization
Accessing the “Dev” view, it will display our custom component. 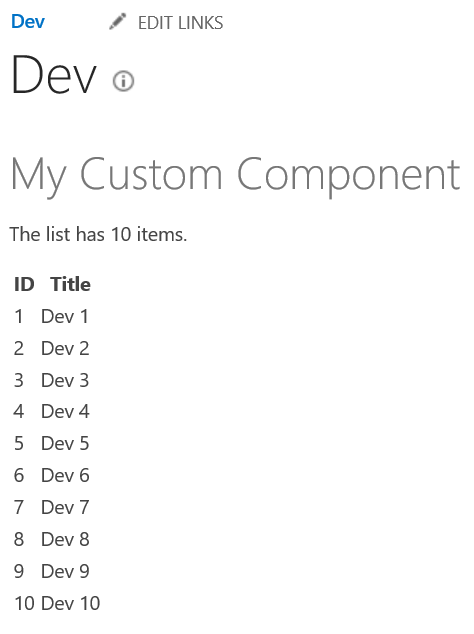
Remove Customization
Since the “Dev” view has the JSLink script already loaded, we don’t need to load the script manually. Simply press the “F-12” key to view the developer tools and use the helper script class to clear the JSLink property. 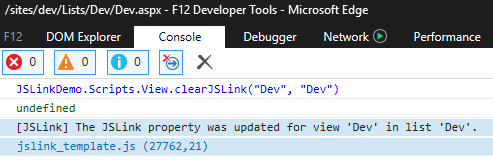
Test Default
Refreshing the screen will display the default list view. 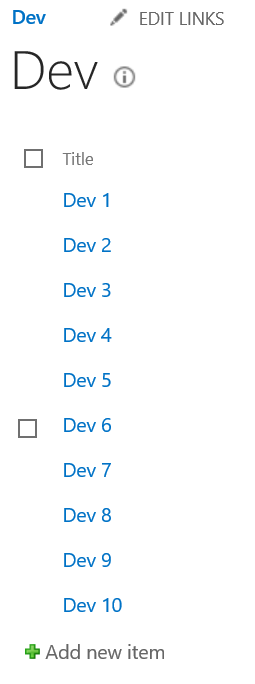
Conclusion
I hope this post gives a great overview of CSR overrides, and the starter project saves you time.