SharePoint 2013 Modern WebPart
This is the first of five posts giving an overview of creating modern webpart solutions for SharePoint 2013+ environments. The webpart library is part of the gd-sprest SharePoint REST Framework. The demo code can be found in github.
- Modern WebPart Overview (This Post)
- Demo 1 - TypeScript
- Demo 2 - React
- Demo 3 - VueJS
- Demo 4 - AngularJS
Overview
Developing for SharePoint 2013 environments can be difficult, given the new modern web stack. This post will give step through various ways of creating client-side solutions in SharePoint 2013 using the modern web stack.
Frameworks
The original code for this library came from the gd-sprest-react library. I wanted to make sure the solution was framework independent, so you can reference this from any framework you choose to work with. My goal in this post is to give examples of developing webparts using the following frameworks:
WebPart Logic
I have an article going over the high-level details of this approach. I recommend referring to this post for a high level understanding of the solution. The solution utilizes the ScriptEditor webpart where a defined template is used:
- Configuration Element - Optional element for storing custom configuration.
- Target Element - The target element to render the component to.
- Render Events - Display, Edit and Post render events exist, passing the webpart information.
WebPart ID
The library will determine the webpart id, based on the parent elements. Having this information allows for multiple instances of the same webpart object to exist on the same page.
Demo #1
The first demo will use the gd-sprest-js library to render a webpart. This library extends the Office Fabric-UI JavaScript library. The gd-sprest-js library files can be downloaded from the github site under the dist folder. The following libraries are available:
- gd-sprest-js.js (816 KB)
- gd-sprest-js.min.js (385 KB)
- gd-sprest-fabric.js (1.06 MB)
- gd-sprest-fabric.min.js (627 KB)
The gd-sprest-fabric library includes the office fabric css files, so you don’t need to reference them. If you use the other file, then you must reference the Office Fabric-UI Core 5.x library. For this example, we will reference the gd-sprest-fabric.min.js file directly from github.
Step 1 - Upload Assets (Optional)
This step is only required if your environment doesn’t have access to the internet, of if you prefer to reference a file from within SharePoint. 1) Download the library 2) Upload the file to SharePoint
Step 2 - Create a Demo Page
This demo will be tested in SharePoint Online, so make sure to create a classic webpart page. 1) Create a webpart page of your choice 2) Edit the page 3) Add a script part editor 4) Edit the “Snippet” and add the following: The gd-sprest-js library has various webpart templates available. This example will use the list webpart template to allow the list to be configured by the user. Below are the webpart properties we will use in this example.
- odataQuery - (Optional) Setting the ODATA query to order by the “Title” field
- cfgElementId - The id of the configuration element.
- elementId - The id of the webpart element to render to.
- onRenderItems - The render list items event. We will use the fabric “List” component to render the item “Title” and “ID” properties.
<div id="demo"></div>
<div id="demo-cfg" style="display:none;"></div>
<script src="https://cdn.rawgit.com/gunjandatta/sprest-js/master/dist/gd-sprest-fabric.min.js"></script>
<script type="text/javascript">
    SP.SOD.executeOrDelayUntilScriptLoaded(function() {
        $REST.JS.WebParts.WPList({
            odataQuery: {
                OrderBy: ["Title"]
            },
            cfgElementId: "demo-cfg",
            elementId: "demo",
                        wpClassName: "fabric",
            onRenderItems: function (wpInfo, items) {
                var listItems = [];

                // Parse the items
                for (var i = 0; i < items.length; i++) {
                    // Add the item
                    listItems.push($REST.JS.Fabric.Templates.ListItem({
                        primaryText: items[i].Title,
                        metaText: items[i].Id
                    }));
                }

                // Render the list
                $REST.JS.Fabric.List({
                    el: wpInfo.el,
                    items: listItems
                });
            }
        });
    }, "gd-sprest-js.js");
</script>
If you are not referencing the file from github, update the src location to the file in step 1. The gd-sprest libraries are available through the $REST global variable. It’s optional to use the SP.SOD.executeOrDelayUntilScriptLoaded method, but wanted to demonstrate that it’s available. 5) Save the page, so the code and html is saved.
Step 3 - Configure the WebPart
The last step is to configure the webpart. Since we are using the list webpart template, there is no need to write code to reference the list in the current or other webs. 1) Edit the page and you will see a configuration button 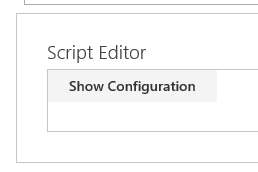
2) Clicking on the configuration button will display a panel to configure the webpart. 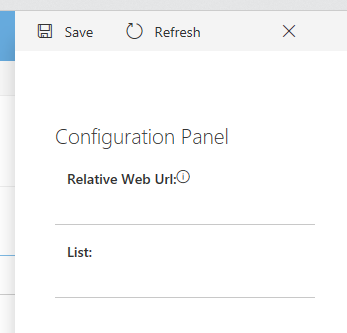
3) For this example, I’ll use the “Dev” list. Click on the list dropdown and click on “Save”. 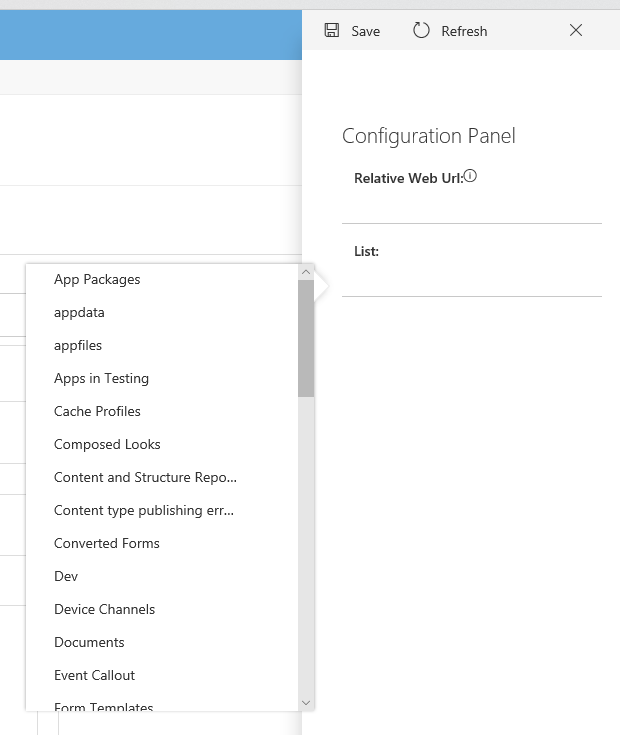 Optional - You can set the relative web url to another site, and select a list from a different web. Click the “Refresh” button to reload the lists dropdown.
4) After the page saves the webpart data, stop editing and view the list data. 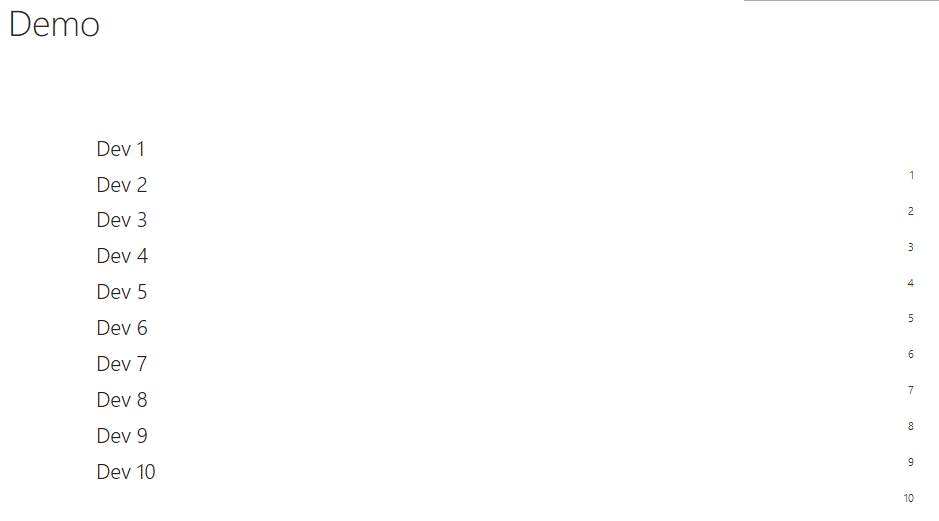
Conclusion
I hope you found this demo useful. Now that we have covered a basic JavaScript example, lets jump over to other examples using the modern web stack. The next post will give an example of creating this in TypeScript.