SharePoint 2013 Modern WebPart (1 of 4)
- Modern WebPart Overview
- Demo 1 - TypeScript (This Post)
- Demo 2 - React
- Demo 3 - VueJS
- Demo 4 - AngularJS
TypeScript WebPart Example
This is the first of four demos giving an overview of creating modern webpart solutions for SharePoint 2013+ environments. The demo code can be found in github. The goal of this post is to take the simple JavaScript example we created in the previous post, and create it in TypeScript. This example will use webpack and babel to compile and bundle the code into a JavaScript files using ES2015 standards.
Requirements
- NodeJS - A superset of JavaScript functions. NodeJS allows us to develop code similar to C#, which is compiled into JavaScript.
- TypeScript - Link to TypeScript for reference.
Global Libraries
After installing NodeJS, we will install TypeScript globally. This will allow us to link it to our project, so we don’t need this library stored w/in each project.
npm i -g typescript
Project
Create the NodeJS Project
Using the command-line, create the project folder and initialize the project. This will create the package.json file for the NodeJS project.
mkdir demo-wp
cd demo-wp
npm init --y
Running the ‘npm init –y’ command will select the default values and create the package.json file.
Install the Libraries
- Babel - The babel-core, babel-loader, babel-preset-es2015 & ts-loader are referenced by WebPack to compile the TypeScript code to JavaScript ES2015 standards
- gd-sprest - The library used to create the webpart
- gd-sprest-js - The javascript library extending the office fabric-ui javascript framework
- WebPack - Used to compile and bundle the code into a single output file
npm i --save-dev gd-sprest gd-sprest-js babel-core babel-loader babel-preset-es2015 ts-loader webpack
This will download the libraries to the node_modules folder.
Source Code
Create a “src” folder and add the following files
SharePoint Configuration (src/cfg.ts)
To stay consistent with the out of the box (OTB) SharePoint experience, we will be using the gd-sprest library’s Helper class to automate the creation of webparts.
import { Helper } from "gd-sprest";
/**
* Configuration
*/
export const Configuration = Helper.SPConfig({
WebPartCfg: [
{
FileName: "wpDemo.webpart",
Group: "Demo",
XML: `<?xml version="1.0" encoding="utf-8"?>
<webParts>
<webPart xmlns="http://schemas.microsoft.com/WebPart/v3">
<metaData>
<type name="Microsoft.SharePoint.WebPartPages.ScriptEditorWebPart, Microsoft.SharePoint, Version=15.0.0.0, Culture=neutral, PublicKeyToken=71e9bce111e9429c" />
<importErrorMessage>$Resources:core,ImportantErrorMessage;</importErrorMessage>
</metaData>
<data>
<properties>
<property name="Title" type="string">My Demo</property>
<property name="Description" type="string">Demo webpart.</property>
<property name="ChromeType" type="chrometype">TitleOnly</property>
<property name="Content" type="string">
<script type="text/javascript" src="/sites/dev/siteassets/wpDemo.js"></script>
<div id="wp-demo"></div>
<script type="text/javascript">SP.SOD.executeOrDelayUntilScriptLoaded(function() { new WebPartDemo(); }, 'wpDemo.js');</script>
</property>
</properties>
</data>
</webPart>
</webParts>`
}
]
});
Demo WebPart (src/wp.ts)
The demo webpart class will export a class. We will make the “Configuration” static, so we can access without having to create an instance of the library. The constructor of this demo webpart class will create an instance of the WebPart, similar to the first example.
import { Types } from "gd-sprest";
import { Fabric, WebParts } from "gd-sprest-js";
import { Configuration } from "./cfg";

/**
 * Dev Item
 */
interface IDemoItem extends Types.SP.IListItemQueryResult {
    Title: string;
}

/**
 * Demo WebPart
 */
export class DemoWebPart {
    // Configuration
    static Configuration = Configuration;

    /**
     * Constructor
     */
    constructor() {
        // Create an instance of the demo webpart
        WebParts.WPList({
            odataQuery: {
                OrderBy: ["Title"]
            },
            cfgElementId: "demo-cfg",
            elementId: "demo",
            onRenderItems: this.renderItems,
                        wpClassName: "fabric"
        });
    }

    // Method to render the list items
    private renderItems = (wpInfo: WebParts.Types.IWPListInfo, items: Array<IDemoItem>) => {
        var listItems = [];

        // Parse the items
        for (var i = 0; i < items.length; i++) {
            // Add the item
            listItems.push(Fabric.Templates.ListItem({
                primaryText: items[i].Title,
                metaText: items[i].Id.toString()
            }));
        }

        // Render the list
        Fabric.List({
            el: wpInfo.el,
            items: listItems
        });
    }
}
Main (src/index.ts)
The index.ts file will be treated as the “Main” function or “Entry Point” of the component we created. We will import the demo webpart and make it globally available. We will import the required css file, so we only need to reference one file. We will use the SharePoint Script-On-Demand (SP SOD) library to notify other scripts that the demo class is loaded. If you refer to the configuration file, and look at the JavaScript, it utilizes the SP SOD library to control when its called.
import "gd-sprest-js/build/lib/css/fabric.components.min.css";
import { DemoWebPart } from "./wp";

// Add the global variable
window["WebPartDemo"] = DemoWebPart;

// Let SharePoint know the script has been loaded
window["SP"].SOD.notifyScriptLoadedAndExecuteWaitingJobs("wpDemo.js");
Compiler Configuration Files
Before we are able to compile the files, we need to update the configuration files.
Package (package.json)
Update the “scripts” and the “build” option. This will allow us to type in “npm run build” to compile the code.
  "scripts": {
    "build": "webpack"
  }
TypeScript (tsconfig.json)
The compiler options for TypeScript are straight forward. We are targeting the code in the source (src) folder, and outputing ES5 JavaScript.
{
    "compilerOptions": {
        "target": "es5"
    },
    "include": [
        "src/**/*"
    ]
}
WebPack (webpack.config.js)
var path = require("path");
var webpack = require("webpack");

// WebPack Configuration
module.exports = {
    // Entry Point
    entry: "./src/index.ts",

    // Output
    output: {
        filename: "wpDemo.js",
        path: path.resolve(__dirname, "dist")
    },

    // Resolve File Types
    resolve: {
        extensions: [".css", ".js", ".ts"]
    },

    // Module
    module: {
        // Rules
        rules: [
            // CSS Files
            {
                test: /\.css$/,
                use: [
                    { loader: "style-loader" },
                    { loader: "css-loader" }
                ]
            },
            // JavaScript Files
            {
                // Target JavaScript files
                test: /\.js$/,
                // Exclude the node modules folder
                exclude: /node_modules/,
                // Compile the JavaScript ES5 code to JavaScript ES2015
                loader: "babel-loader",
                options: {
                    presets: ["es2015"]
                }
            },
            // TypeScript Files
            {
                // Target TypeScript files
                test: /\.ts$/,
                // Compile the TypeScript code to JavaScript ES5
                loader: "ts-loader"
            }
        ]
    }
}
Compile the Code
Run ‘npm run build’ or ‘webpack’ to compile the code and create the ‘wpDemo.js’ file located in the dist folder.
Error Could not load TypeScript
Since we installed TypeScript globally, we can link to it.
npm link typescript
Demo
Step 1 - Create Demo Page
1) Upload the file to SharePoint 2) Create a webpart page of your choice 3) Access the page
Step 2 - Install the WebPart
1) Press F-12 to access the developer tools 2) Click on the “Console” tab 3) Reference the script - We will use simple javascript to insert a script link into the page. Afterwards, our library will be available.
var s = document.createElement("script");
s.src = "/sites/dev/siteassets/wpDemo.js";
document.head.appendChild(s);
4) Install the webpart
WebPartDemo.Configuration.install();
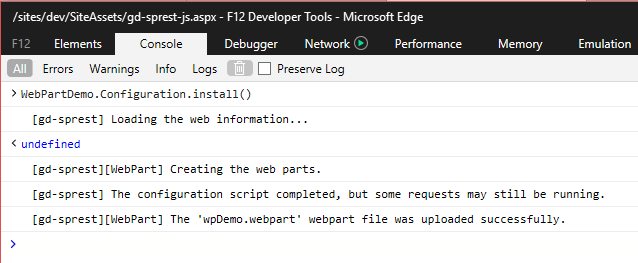 This part may take a little time to initialize, depending on the size of the web.
Step 3 - Test
1) Edit the page 2) Click on a webpart zone to add a new webpart 3) From the webpart gallery, select the “Demo” group “My Demo” webpart 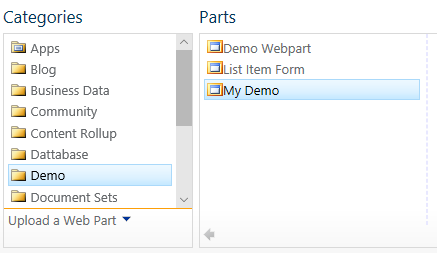 4) After the page reloads, the configuration button will be displayed
 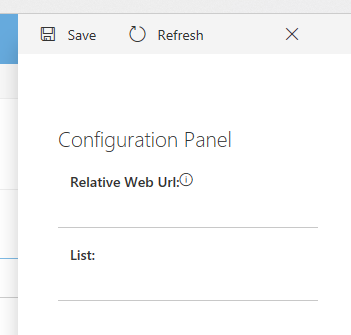 5) Clicking on the button will display the configuration panel
 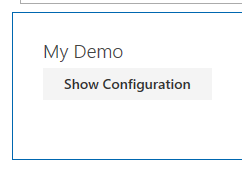 6) For this demo, we will use the “Dev” list
 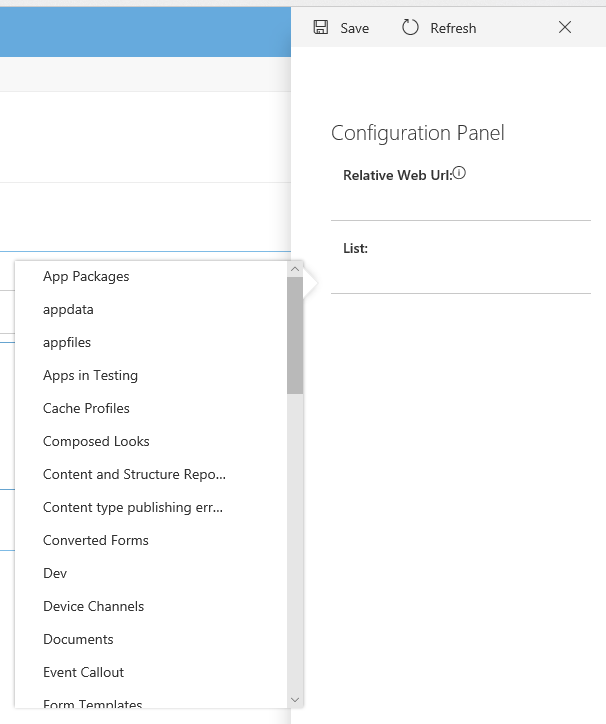 7) After selecting the list, save the form and the list view will be displayed
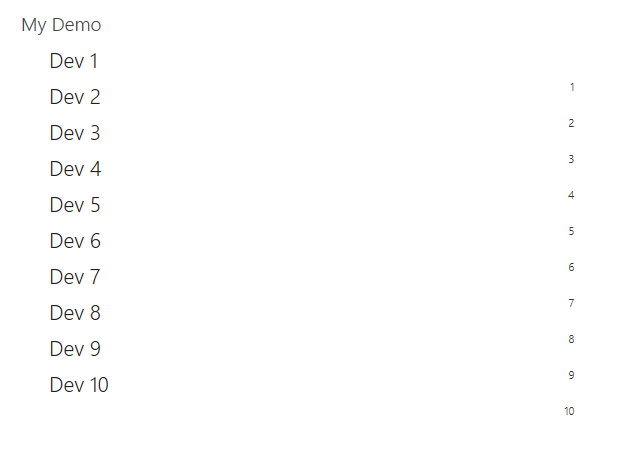
Step 4 - Clean Up
1) Press F-12 to access the developer tools 2) Click on the “Console” tab 3) Uninstall the webpart from the gallery
WebPartDemo.Configuration.uninstall()
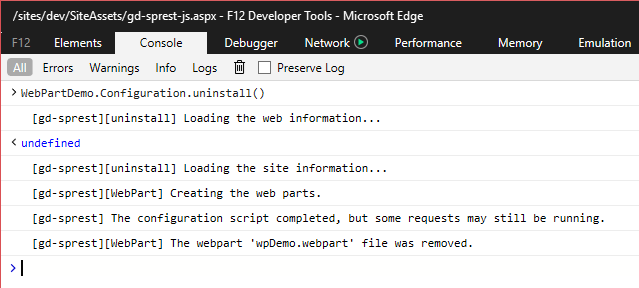 This part may take a little time to initialize, depending on the size of the web.
Conclusion
I hope this post was useful and wasn’t too overwhelming with the new modern web stack. This solution is useful for simple and quick ways of developing solutions. Creating more robust applications will require a framework (React, VueJS, Angular, etc). The next post will give an example of creating webparts using the React framework.